

Restore WordPress Site BackUpBuddy
Background
This tutorial is a follow up “How to backup wordpress installation with backupbuddy” so, if you have not backed up your WordPress site yet, i encourage you to follow the steps outline in the tutorial “How to backup wordpress installation with backupbuddy” before continuing your reading.
Assumptions on: Restore wordpress site backupbuddy
- I assume you have completed wordpress site backup as outlined in “How to backup wordpress installation with backupbuddy“.
- I assume you have two files (backupbuddy.php and “the-complete-wordpress-backup.zip”) ready.
- I assume you know how to use file transfer protocol (FTP) OR any FTP program like filezilla, cuteftp, WinSCP etc.
- I assume you know how to create database from your hosting account control panel
-
Restore wordpress site with backupbuddy, Ready state steps
Upload the two file to your live server using ftp.
(Upload to the folder where you want to install wordpress)
Create a new database via your hosting account control panel. Take note of the database name, database user and database password. Grant all privileges to this user.Restore wordpress site backupbuddy: Step by step guide
Once you have uploaded the two files (backupbuddy.php and “wordpresssbackup-file.zip”) to your live server. Use your favorite browser to navigate to the folder/backupbuddy.php.
E.g if you uploaded the backup files to the root directory (http://my-wordpress-site.com)
You need to navigate to the location: http://mysite.com/backupbuddy.php
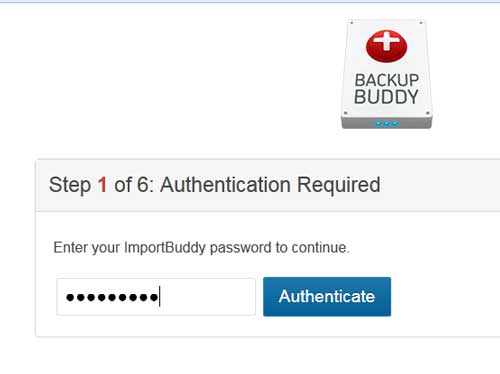
More examplesuploaded location navigate to http://uploadfolder.mysite.com http://uploadfolder.mysite.com/backupbuddy.php http://mysite.com/uploadfolder http://mysite.com/uploadfolder/backupbuddy.php Restore wordpress site backupbuddy, authentication step
Enter the authentication information
View backup file ready for extraction
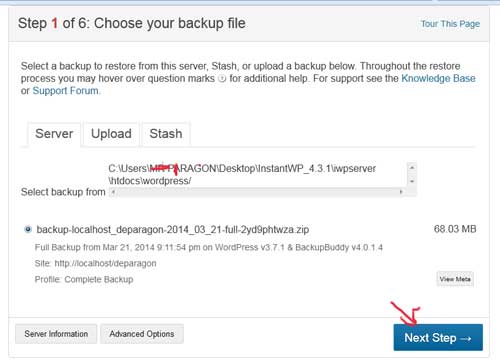
Proceed to backup extraction process
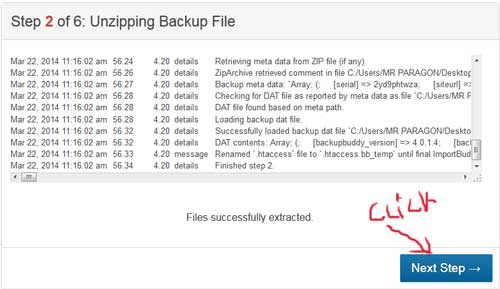
Extraction completed successfully, it is time to migrate database files.
Database Host: Localhost (most of the time)
Database user: Copy from “Ready state step” the database user
Database password: Copy from “Ready state step” the database password
Database name: Copy from “Ready state step” the database name
Table prefix: Use any prefix for the database table (e.g md_, wp_, cg_, ff_, ae_ etc)
You don’t really need to use the advanced database option unless you know what you are doing.
Fill in the database details on the text fields and test for database connection.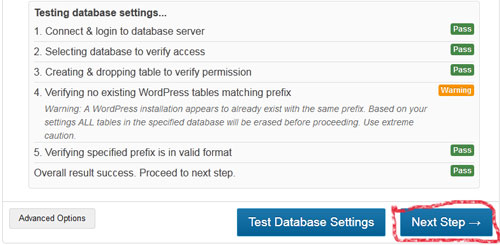
Click next to proceed with database import and site migration

Once database import is complete, site migration is initiated
Completed site can be viewed on the browser.
Login to your site dashboard, confirm that all is ok: links are loading file.Remember to delete all backupbuddy files(importbuddy.php and the backedup_site_file .zip file) for security reason.
Thanks for reading “Restore wordpress site backupbuddy”, Your comments are welcomed.


This is the best tutorial on backupbuddy on the internet. Thanks for making this tutorial available on the internet. up you